


Introduction
In AutoCAD, precision is everything. When placing or modifying geometry, object snaps (osnaps) help ensure accuracy by automatically detecting key points — such as endpoints, midpoints, centers, and intersections. But sometimes, users feel that the snap behavior is too aggressive. The cursor seems to “jump” or “stick” to a point, even when it’s not exactly aligned. This behavior is often called the AutoCAD snap magnet.
Many users wonder: Can I reduce or increase the strength of this magnetic snap? Can the cursor sensitivity be customized to avoid unwanted snapping?
While AutoCAD doesn’t offer a setting to directly change the magnet’s pull, there are several system and software tweaks that can help you gain more control over snap behavior. This guide explains everything you need to know about improving your snapping experience — and clarifies what can and cannot be changed.
Table of Contents
What Is the AutoCAD Snap Magnet?
When object snaps are enabled, your cursor automatically locks onto nearby points as you move. This behavior improves drafting precision — especially when working with lines, arcs, or geometry that needs to align perfectly.
The snap magnet refers to the feeling that your cursor is being “pulled” toward a point even when it’s not directly on it. While it’s meant to help, the effect can be distracting — especially when drafting complex objects or working on high-resolution screens.
This leads many users to ask: Is there a way to adjust how far the cursor reaches to snap to a point?
Why It Can’t Be Adjusted Directly
Unfortunately, AutoCAD does not include any setting, variable, or registry key to adjust the radius or strength of the snap magnet. The behavior is built into the way osnaps work and cannot be customized directly.
That said, you can still improve your overall snapping experience by adjusting settings that affect when and how snaps are activated. Let’s explore those options next.
How to Improve Snap Accuracy In AutoCAD
Here are five key methods to improve your control over object snaps in AutoCAD, even if you can’t change the magnetic strength directly.
1. Adjust the Aperture Size
The aperture defines the detection zone around your cursor. It tells AutoCAD how close your crosshair must be to trigger a snap. A smaller aperture means more precise snaps; a larger aperture increases the detection range.
To change it:
-
Use the
APERTUREcommand -
Or go to Drafting Settings → Drafting Tab → Aperture Size
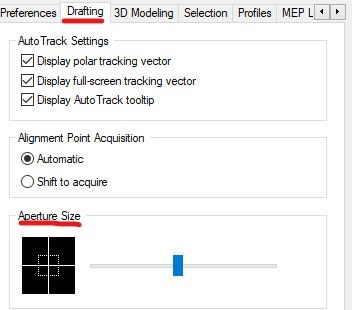
Aperture size setting under the Drafting tab in AutoCAD Options
2. Show the Aperture Box
To visualize the aperture zone, turn on the aperture box:
-
Command:
APBOX -
Set to:
1(ON)
This box shows the exact area within which AutoCAD is detecting osnap points. It helps you understand if the snapping is happening too early or too far.
3. Change Marker Size and Snap Display
You can also adjust the visual appearance of osnap markers:
-
Go to Options → Drafting Tab
-
Modify AutoSnap Marker Size, toggle Magnet, and adjust other visual aids
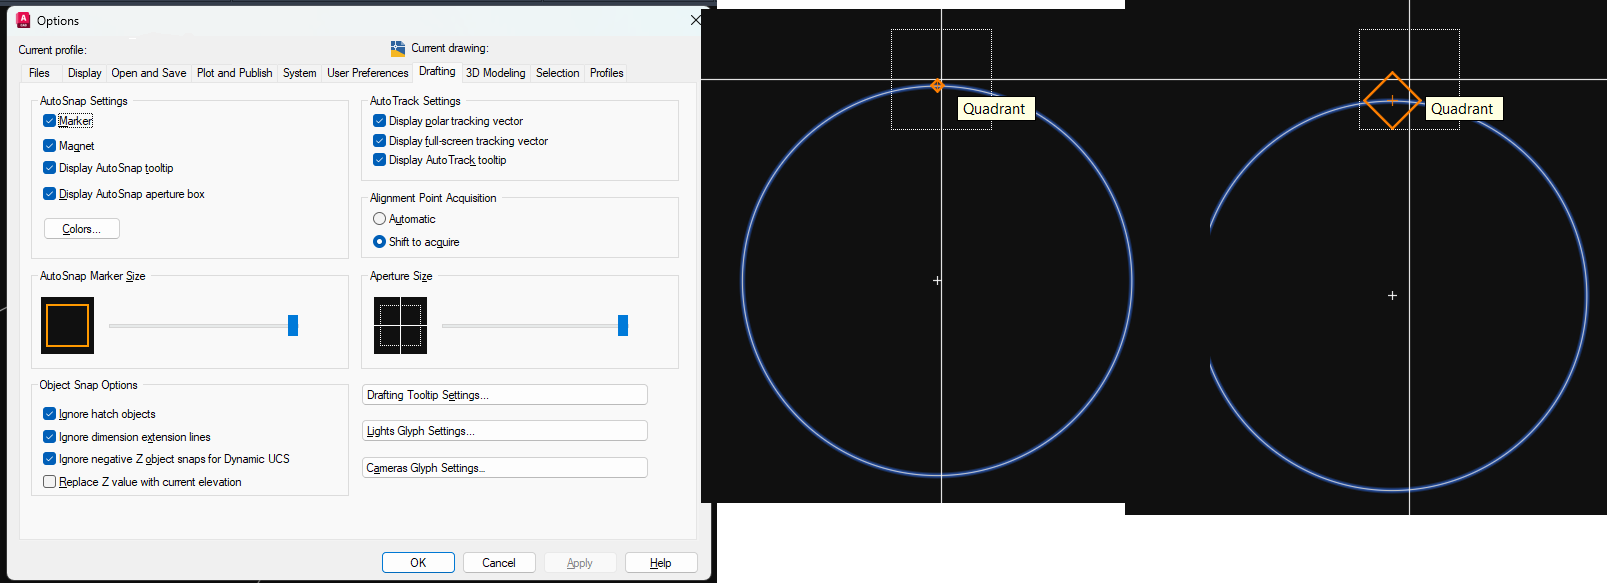
AutoCAD Drafting tab settings showing Magnet, Aperture, and Marker Size sliders
These settings don’t affect the strength of the magnet, but they do make the snapping behavior more predictable and visually understandable.
4. Turn Off Enhance Pointer Precision
Some snapping oddities may be caused by your Windows mouse settings rather than AutoCAD itself.
To reduce erratic snapping:
-
Go to Control Panel → Mouse → Pointer Options
-
Uncheck “Enhance pointer precision”
-
Click Apply and restart AutoCAD
This removes cursor acceleration and improves pixel-level accuracy.
5. Use Zoom Strategically
Zooming in on your drawing reduces the screen distance between objects, making the aperture area feel smaller and giving you more control over where snaps are triggered.
This is particularly helpful when dealing with tight geometry or dense layouts.
Cursor snapping to quadrant with visible AutoSnap marker and aperture box
You can also combine zooming with smaller aperture settings for better performance.
Can Registry Hacks Help?
Some users have speculated about registry edits to customize snapping behavior. However, Autodesk has not published any documentation or supported registry values that control snap magnet strength.
There are no known registry paths that influence this feature. Attempting to edit registry entries related to osnaps may result in unpredictable behavior and is not recommended.
Conclusion
While AutoCAD does not allow users to directly change the snap magnet strength, there are multiple ways to gain better control over how and when snapping occurs:
-
Adjust the aperture size
-
Enable and tune AutoSnap visual markers
-
Disable pointer precision in Windows
-
Zoom in to reduce over-snapping
Together, these techniques can significantly improve your drafting precision, especially on modern displays with high resolution.
For professional users working on detailed layouts, these small adjustments can make a big difference.
Related Resources
Final Thoughts: Why Snap Precision Still Matters in 2025
In a design environment where speed often competes with precision, mastering your snapping behavior in AutoCAD is more important than ever. The snap magnet feature, while not fully customizable, plays a critical role in helping designers align, connect, and build geometry with confidence.
Even though AutoCAD doesn’t allow users to control the snap magnet’s strength directly, the tools we can use — like aperture adjustments, AutoSnap markers, pointer settings, and viewport zoom — give us the power to create more precise, less frustrating workflows. These adjustments may seem small, but over the course of a complex drawing session, they can significantly reduce errors, rework, and lost time.